|
Has |
Did you come here from a link on another website? See page
bottom for latest version of this page.
The debate has long been whether
skis or boots are the most important element of ski equipment. TO BUY OR TO RENT? Renting boots and skis is a good option for those first trying the sport. What if one doesn't like skiing, or can't do it because of some limitation? As soon as one has decided on keeping the sport, however, boots should be purchased. Getting a good boot fitting is not easy, and the time to get one should not eat into your skiing time, as it would if you rented boots each ski trip. Too, the liners of the boots do with use conform more closely to your feet; rental boots will have conformed to someone else's feet. The main reason to purchase skis is for consistency from one ski time to another; skis of different types have "personalities" and require that we fine-tune our balance and movements to their performance. The end result is greater enjoyment. Some advanced skiers continue to rent skis, preferring to have access to the latest equipment without laying out a big investment; this is especially true for skiers who take annual ski vacations of a week or two. When you are ready to buy, consider doing so in the spring or early fall. That's when the ski shops are more likely to have sales--to clear out the prior season's stock. Of course you won't have quite the latest offerings, especially if there has been a significant design change as sometimes happens, and your selection may be somewhat limited. SKIS The shape of skis. Nearly
all alpine skis have shaped sides; that is, across the width of the ski, the
waist or underfoot part of the ski is narrower than the tip and tail parts. The
dimensions at tip, waist, and tail are also varied for differing purposes. In
recent years, the waists are being made relatively much more narrow than before,
a major trend in the sport. With characteristic disregard for precision by
Americans in speaking their language, these new skis have come to be called
"shaped" skis, and the older, less-shaped skis are now "conventional" or
"traditional" skis. The line along the sides of the skis is the "sidecut", and
it may be made to follow various mathematical curves such as a circle or
parabola that presumably would match the theoretical track of a ski in a
carving turn. (Said more accurately, "Sidecut radius refers to the circle that
would be created if the ski's sidecut curve were extended 360 degrees"--Seth
Masia in Skiing Heritage Jan/Feb
2012, p. 4). Hence the shaped skis are sometimes called parabolics. A ski with
greater sidecut, when tilted on its side, can bend more than one with less
sidecut, and therefore the extra-sidecut ski will turn in a tighter arc. Such
skis tend to ski best when on edge and make fine carved turns. For many skiers,
shaped skis have added new dimensions of pleasure to skiing. For best results
they are skied differently from conventional skis, however, and most skiers must
go through a period of adjustment when they switch to shaped skis. Watching
skiers on the slopes, though, it appears that most skiers who have switched to
the newer shaped skis have not yet adjusted their styles. They are therefore not
getting the value they paid for, and would appear to be able to benefit from
coaching. With such coaching, skiers soon experience
Shaped skis: Now a personal aside from this instructor who has taught skiers before shaped skis and after. While the carving ski (one in which the tail of the ski follows the line taken by the tip) is a delight to ride, it maintains the maximum speed or even accelerates while going around turns. The only way to slow a carving ski is to cause it to ski around in a wider arc. But there are times when one needs to have more slowing than this provides, and then the skis must be taken out of the carve and made to skid to create friction with the snow, a slowing force. To skid, the tilt of the ski to the snow has to be flattened or steepened so that the skis break sidewise out of a turning arc. Shaped skis resist this. Alas, however, even new skiers are now outfitted with shaped skis. And so these skiers, with feet that are still poorly trained, find it difficult to adjust the skis’ tilt, and so may not slow as they want. Thus shaped skis require more time be spent in learning to skid. But exercises for this take practice and coaching and unfortunately may not be seen as “real “skiing and thus can be resisted by students who may not want to “waste” valuable lesson time. Sidecut and Turn Shape. Among the many factors that produce turn shape is the amount of "sidecut" a ski has. Sidecut is observed by looking down at a ski's top or bottom and noting how much narrower it is under its waist (foot or binding area) than it is at the tip and tail. Generally, a ski with more sidecut will turn in a tighter radius than one with less sidecut. Ski manufacturers find these dimensions so important, they often include them in their product descriptions. Because the ski tip/underfoot/ski tail width dimensions commonly stay the same throughout the length of a ski, a longer ski will have a longer turning radius than the same model in a shorter length. And there are some skis with dual radius sidecuts, which have performance described this way elsewhere on the internet:"In front of the binding, a shorter radius sidecut provides quick response and control for tighter turns while a longer radius in the tail keeps you stable, feeling solid when you’re charging. The result is a ski that surfs seamlessly between different turn angles and never drags." Camber and Rocker. Another
trend in ski design involves how the underfoot part of the ski arches up or
down. For
More on Rocker: Rocker: Now the rage in ski design is “rocker”. Traditionally, when held base to base, skis touched at tips and tails but had a gap between them at their middles. Today that gap is disappearing, or has disappeared, on rocker skis, and, when rocker skis are so held, their ski bases may even flare away from each other in the forebody or tail area—or both, but touch at their middles. This is rocker. Originally the idea was that a ski with rocker would tend to plane upward when skied in soft snow whereas one without rocker would tend to dive—along with the skier, of course. Early on, rocker became the rage for skis used in deep soft snow. Now, however, the designers are making rocker skis for packed snow. Because the skis are lighter or not in contact with the snow at their tips and/or tails, the skis can be more easily pivoted with the feet, resulting in quicker and easier turning. Skiers have long gotten a similar effect simply by dulling (“de-tuning “) the edges in the tip and tail areas of skis so the edges are less likely to grab the snow when turning. Of course, there are times when you may not want the skis to turn more easily, as in high speeds. And on ice you may want all the grip you can get along the entire ski . Although making skis with rocker seems to be a brand new idea, Head, perhaps unwittingly, produced a ski that gave the same effect. Head made a ski that was so limber that when you stood on it in powder, the tips and tails bowed upward, thus better planning above the snow surface when in motion. That invention was some 50 years ago! Of course, powder skis since then have mostly been made softer than skis for packed snow for this same reason. Ski Tails: Many if not most skis now come with a tip in the tail. That is, the tail of the ski is turned up like the shovel. Remind you of a Volkswagen bug? Just as the upturned tip will help you ride up over obstacles, so will the upturned tail--if you are sliding backwards. But otherwise it is not of that much use. Ski Edges: The rage for the last decade has been the shaped ski. But a shaped ski will not do much without a precise metal ski edge. If the idea is for a shaped ski to carve a turn better, then an imperfectly tuned edge will instead allow the ski to skid sidewise instead of slicing lengthwise along the arcs of turns. To carve better, then, pay attention to your skis’ edges. Nicks and burrs—even small ones—affect performance greatly. There are times when you should have a shop work on your edges, but in between such major tuneups you can keep your edges “healthy” yourself. Get a diamond file (they come in different grits) and, after feeling the edges to see if they are smooth or a bit ragged or scalloped in places like a steak knife, run the file along the sides and bottoms of the steel, paralleling the surfaces. Usually a few passes will restore the edges to a good-enough condition unless you are a dedicated racer. Unsure? Ask your instructor for a demonstration. Also, learn about edge bevel, in which the side and base of the edge meet at other than 90 degree angles. See www.SkiMyBest.com/skiequip and scroll down to “Ski Edges”. Length of skis. Ski length is not the important factor in ski selection that it once was. Because skis are now made from materials that give greater torsional stiffness, a shorter ski can grip the snow as well or better than a longer one of earlier days. Too, wider skis may have more surface area than longer skis that are narrower. A "quick and dirty" way to decide on ski length is to check the lengths a manufacture provides for a given ski model, rank your own weight and height with reference to that of the general population. For instance, are you taller and heavier than average but not as tall and heavy as the tallest? Then try out the ski length of those available that is next to the longest for that model. If you are in the tallest and heaviest class, try out the longest ski available for that model, etc. For a ski sizing chart with considerations, go to evogear.com: exits Stiffness of skis. Nowadays we want skis to bend when tilted so they will arc us more cleanly into turns. Yet skis that are stiff longitudinally are still preferred for those who ski faster on hard snow or ice. Softer skis are generally preferred for slower speeds and in moguls as well as in powder. Individual preferences vary, however.. Ski edges. Skiers sometimes speak of sharp edges, but skis' should not be sharp like a knifeblade's edge. A ski's edge should be squared off instead, with the square- or nearly square-corner smooth. You should be able to run your finger along the edge and only feel this smoothness. Because skis' edges are made of special steel they are harder than snow or ice and will not be dulled much by sliding over them. Steel is not as hard as most rocks, however, and sliding over rocks or even grains of sand or dirt that may be imbedded in the snow or exposed where the snow is thin will cause the edges to dull. An impact could even cause a burr, a thin line of ragged metal, to be scraped out along a ski's edge. These uneven and rough marks on the edges drag against the snow and slow the ski, catch the snow, and impede pivoting the ski. The firmer the snow surface the more the condition of skis' edges affects ski performance--and your performance, too. But in softer snow, edges are usually not critical so long as they are smooth, for the ski planes around on its base; even so, getting to and from areas of soft snow can involve passing over harder snow where edges will matter. Beginning and intermediate kiers often are not familiar enough with what they are supposed to feel to know when the edges are adversely affecting their skiing. Advanced skiers may notice, however. And expert skiers can get downright fussy. Racers and other higher level skiers work the edges with files to keep them smooth and even file the edge's corners to make angles slightly different from a 90 degree square, sometimes taking more off the bottom part of the edge, sometimes more off the side. Doing so causes the ski to perform differently. For instance, if the bottom part of the ski's edge is filed so it slopes upward to the side of the ski (when the ski is base-down), the edge is less likely to catch when the ski is pivoted, but also more likely to pivot and less likely to carve. And if the side edge is filed so it slopes more inward to the top of the ski and the edge is therefore at an acute angle of less than 90 degrees, the edge will cut into hard snow or ice better and track more in a carving turn. Differences as seemingly minor as 1/2 degree can significantly alter how skis perform. Varying the edge angle along the length of the ski is another practice. Some skiers slightly bevel upward only the bases of the skis' edges at the tips of the skis ("detuning them") to allow the tips to slip around better when the skis are pivoted, but still track well if the edge under the boot part of the ski is normal. With conventional skis, edges were an important factor in ski performance; with newer shaped skis, their effect can be dramatic. Therefore, nowadays, edges must be maintained more. Too, each ski manufacturer recommends edge tuning angles for which its ski models are designed to perform best, although individual skiers will have their own bevel preferences for the type of skiing they do on the terrain they expect to encounter. The chart below is from Ski & Snowboard Tools & Wax by Tognar Toolworks: exits, 2005-2006 (a free catalog full of useful tuning tips and equipment and how to use it--get one): Manufacturers' Ski Bevel Recommendations
Edge angle chart from Thepisteoffice.com website on 12/3/2018: Ski Manufacturers edge angle specificationsMAKE/MODEL: BASE EDGE ANGLE, SIDE EDGE ANGLE
This information is based upon factory published specs or the angles I've measure when prepping new skis. However the angles should always be checked before tuning any skis for the first time.
Armada: All models: 1,1 (Source: Tyson Hall, Armada Skis) Amplid:
All models: 0,0 (Email from Anian Thrainer of Amplid although I can't believe that they ship a ski with a zero base edge angle) Atomic:
All models: 1,3 Black Crows:
All models: 1,1 Black Diamond:
All models: 1,2 (Source: Brad Curkendall, Black Diamond via Steve Haigh) Blizzard:
All models: 1,3 (Wolfgang Leitner, Blizzard Sport GmbH) Coreupt: Slasher: 1.5,1 DPS:
All models: 1,2 Dynafit:
All models: 1,1 Dynamic:
All models: 1,2 Dynastar:
All models: 1,1 Elan:
All models: 1,1 Faction:
Wednesdays: 1,1 Fischer:
All models: 1,3 Hart:
All models: 0.5,1.5-2 Head:
All models: 1,1 High Society:
All models: 1,1 Icelantic:
All models: 1,3 Kastle:
RX models: 1,3 All other models: 1,2 (Source: Phil, Kastle USA) K2:
All models: 1,2 Line: All models: 1,1 Moment:
All models 1,1 Movement:
Email from factory: "The base bevel is 1 & the side angle is 1" Gaby, Movement Skis Nordica
All models: 1,2 (source: Sara at Nordica USA) Olin:
All models: 1,1 PM Gear
All models: 1,2 Prior
All models: 1,1 Rossignol:
All models: 1,1 Salomon:
All models: 1,2 Scott:
Their website says all models are 0.5-0.8,1 but in reality they're all 1,1 except the Black Majic which is 1,87 Ski Logic:
All models 0.7,1.5 Stockli:
Email from Stockli: Most Stöckli skis have a factory base bevel of 1 and a side bevel of 1 to 2, most common is 2. For the World Cup skis we use a bevel of 0.5 (Base) and 2 or 3 side, most common is 3. Storm:
All models: 1,2 Volant:
All models: 1,2 Volkl:
All models: 1,2 Whitedot:
All models up to & inc 12/13 production are 1,1 (not 1,3 as advertised by WDF) All models from 13/14 production onwards are 1,3
Higher-level skiers often carry small files with them so they can maintain their skis' edges right on the slopes, or at lunchtime, should their skis take a hit from a rock. These files may be made with industrial diamonds, and there are also "gummy" stones to smooth off minor burrs. Racers frequently arrive at the top of their course on one pair of skis, then change to a different pair so they will have fresh edges on their timed run. Working on the edges is a part of tuning skis, and the comparison with tuning of a piano is apt, for a tuned ski can make music for you while an un-tuned ski can give you discords. An un-tuned ski or a badly tuned one can alter performance of a pair of skis as much as changing to a new kind of ski. You can tune skis yourself, but will need to learn how first, and get some equipment. There are books, videos, and tuning clinics. Or you can take your skis to a ski shop and have them tuned for you. You can specify the bevels you want. At least ask what the shop recommends; some shops might tune all skis with the shop's standard. Shops have machines that usually do the job better than most of us can do with hand tools, but having a skilled technician hand-file your bases may give a better result with less of the material being taken off.. Another approach is to get a tune at the shop every 10 or 20 days of skiing (depending on how hard the snow is and how many rocks are about) and then do minor tune-ups by hand in between. Ask around, though, to be sure you go to a shop that will give a good result; racers and ski instructors usually are the most knowledgeable about which local shops do satisfactory work. Ski Bases. The idea in skiing is to slide: "skiing is a sliding sport". Slliding happens because pressured snow or ice melts at the tips of its crystal arms, and that thin film of water allows the ski to slide across the otherwise cold surface. When the snow temperature is colder--about 10 degrees Fahrenheit, most skiers do not produce enough pressure to cause these crystal snowflake tips to melt, and the snow feels like it is dragging under the ski. Specialized ski bases are now used so they will slide well under most conditions except extreme cold. Like edges, however, the bases must be smooth and without hollows or high spots that would affect the ski's performance. You can inspect your bases by holding the ski base-up to a light and running a straight-edged object along its length while peeking along the ski base to see if light comes under the straight-edge. The bases should be even from edge to edge, with virtually no light coming through. If there is light you may need to have your bases flattened. Do this at the same time as you have your edges tuned. If a ski base touches the snow more than do the edges, the edges will be less likely to engage, and the ski will not track well on its edges; it will probably be easy and maybe too easy to pivot, however. If the edges touch the snow more than do the bases, the ski will tend to stay running in a straight line even when you try to have it turn. You will have to apply more force or tilting then to get it to turn and it feels like it grabs the snow or that the tip hooks you sooner or more sharply into a turn. Of course bases wear when they slide on the snow; they are made only of plastic, so sand, dirt, and rocks are certain to erode them. Sometimes a rock will gouge a groove into the base, and such grooves can cause new performance patterns in the ski, perhaps making it turn when we wanted it to go straight. Periodic flattening is therefore required. These grooves can be refilled with home methods or by ski shops. Again, some minor work can be done by hand, but most skiers who maintain their bases use professional shops for major work. Be aware that a new ski may require tuning. After manufacture, the plastic base may continue to set and often arches or perhaps it wasn't made level in the first place. So, check bases of new skis, too, and have them tuned if they need it. One other aspect of ski bases is what is called "structure". The film of water that the ski slides over can hold the ski back due to capillarity (the same thing that makes water on the side of a glass stick to it so the water level at the side of the glass is higher than in the middle). To break up this film into smaller units, small grooves are sometimes scratched into the base. Again, hand tools are available to do this. And if your skis come back from the tuning shop with little grooves, it's O.K. Waxing. Again, the idea in skiing is to slide. Although modern ski bases slide better now than ever before, a ski base can be made to be best only at one temperature range. And besides, waxes repel water better than plastics. Because we melt the snow crystals slightly as we pressure them when gliding past, if our base has a wax that repels this tiny film of water, we will slip along the best. A ski that slides best will of course go fastest, and some skiers use the reverse of this fact to control their speed. But a ski that does not slide well is also hard to pivot and so will make turning harder. A ski that drags also can slow us up to where certain maneuvers have to be timed differently. Probably the worst case is when the snow temperature is at just the point where the snow will melt and allow us to slide where we are pressuring heavier in a turn, but not melt and cause us to stick where we are pressuring more lightly. Skiing on a sunny day in and out of shadows where temperatures constantly change can produce a jerky effect, too. So the ideal is to have a ski that performs as consistently as possible in the greatest range of conditions. Waxes of varying composition have therefore been developed to be applied under varying temperatures. Wax makers usually tell of the temperature ranges of their products on the packages, and often color their waxes to identify them. Waxes also give some protection to the plastic ski base, so the wax wears rather than the base. But the wax will wear off, too, and then you may see a whitish cast to your bases, or to parts of them where you apply the most pressure. When this happens, we say the bases are dry and they are telling it is time for a new wax job. Wax covers best and lasts longest if put on hot, with an iron. It is best to wax after you know what the day's snow temperature will be, but often this is impractical, so make your best guess or apply a broad-temperature range wax, then carry a few bars of wax while skiing so you can make adjustments on the hill. If you can find a sunny or other warm spot, place the skis base-up so they warm up a bit, then rub the wax bar over the bases, finishing by rubbing it in while pressuring with a cork bar or your palm, developing enough heat through friction to melt the wax into the ski bases. Just as "structure" (small grooves) are cut into the ski bases to break up the water film and thereby reduce friction, structure can be applied in wax surfaces. Right ski/left ski? Almost all pairs of skis are made with the two skis identical. Bindings are usually identical, too, but some may be mounted differently on the right or left ski. Bindings might also have been adjusted differently for the two sides due to differing boot lengths or strengths of the bindings' springs. Some racers' skis have one side curved more than the other; then when the skis are worn one way they will make a narrower arced turn. But when the skis are switched to the other feet, they will make a wider arc turn. Other skis have differing sidecuts so the two skis will make parallel arced tracks, allowing for the different radiuses of turn the skis must make because they are not the same distance from the center of the turning circle. When we make ski turns pressure normally shifts more to the inside edge of the outside ski. (Of course the ski that is on the outside of the turn changes from right to left turns, thus it is always the inside edge of each ski that wears.) That is also the edge more likely to take harder impacts from rocks or sand in the snow, and thus the inside edge wears more. If your skis are otherwise identical, you may get extra wear from the edges by switching which foot you put them on. You can mark your skis to keep track of which foot has been using which ski. Being consistent will also help you "feel" when you have an edge wearing out or a base that is no longer level and be able to identify the correct ski to fix.. How to choose skis. Length is no longer the paramount factor in ski selection. It is only one of many variables in ski design. Nowadays the variety of ski types has expanded dramatically. Other factors include flex--both fore-aft and lateral, side-cut, tip shape, base camber, width. Some skis are designed to be versatile--to work well in many conditions of snow, terrain, and purpose. These factors can vary throughout the ski; for instance, a ski can be made with a soft flex in the tip section, stiffer under the boot, and be of intermediate flex in the tail--or other combinations. Each variation produces its own effect. Other skis are specialized--just for longer radius turns, or short ones, or moguls, or powder, or ice. A general rule is that--other factors being equal--a longer ski tends to track in a line, whereas a shorter ski is easier to turn. Historically, some skis used for downhill racing or soft-snow walking were as long as 16 feet! But there are skis now of only a few feet length that can give quick turns. Of course the bases should be level, the edges squared off, and the edges should touch along their length when the skis are held pressed together under the middles (this means they are not bent). When you place skis against a large flat glass mirror or window with the base of the ski held flat against the glass at one end, the other ski end should also be flat against the glass to show the ski is not warped or twisted, which would lead to erratic behavior by the ski and its rider as well. (Although this flat-surface test is important, often the hardest part is finding a flat surface to use. Square posts sometimes work, especially if of metal for wood tends to reshape itself after it is cut. The key is that the testing device not have its own defects). The weight of a skier is a factor because an aim is to get the ski to bend into an arc so that it will turn us. A lighter skier or one who skis less aggressively will likely want a ski that is softer along the length. This would be true for most children and most women, but also for smaller men. The kind of snow one is in and the type of skiing one likes to do will all influence ski selection, as will personal preferences. A stiff ski or one with a stiff tip will tend to dive in powder rather than float up when it comes to an obstacle; it should be obvious which one you would want then. Because there are so many skis to choose among, ry them out before buying. Early each winter, ski magazines issue reports on new models to give ideas of which skis will do what and how well. Looking over those issues can give you an idea which skis to try out. Usually several models will suit a particular use and skier type. Too, manufacturers have "demo days" at various ski areas where they bring models you can try, often free, but for limited time. Watch for those at your favorite ski area. Many ski shops will also rent demonstration skis so you can try several models in a day (especially if the shop is at the slopes); some then allow your rental cost to be deducted from the sales price if you should buy. Be wary of skis more than a few years old. Even if they appear to be in good condition, they may have been made with materials that have since been improved upon in newer models. If you are just starting skiing or taking it up again after a hiatus, rent skis at first. Your first lessons can be done with shorter, softer skis and turning them will be easier to learn or relearn. In time, though, and as you move onto steeper slopes and ski faster, your skis will need to manage the stronger stresses you will be giving them. You may want a longer, firmer ski than before and also one with new side and bottom characteristics. As we use skis, we get used to their characteristics and so we can then best anticipate how a familiar ski will perform when we give it the moves to make it go this way or that. That is an argument for eventually buying rather than renting. Expert skiers and racers, however, have skied enough that they have familiarity with a variety of skis and so can readjust readily when they change skis for some purpose. Some better skiers who take only a week's ski trip or so per year prefer to rent at their destination. For them, buying a ski to get the latest equipment advances would be costly; by renting they can use the latest gear and even try out different kinds of skis. If they travel to their annual ski week, they also avoid the hassle of hauling skis and/or having a pair get lost in luggage handling. Neither do they have to fuss much with tuning; the rental shop should do that. BOOTS\ What about boots? I’ve an idea about boots. But not all good skiers share it. However, my idea is the same as that of a consultant to the U.S. Ski Team. And that is if the boot is so stiff its upper bends forward too little, then if you flex your knees your weight shifts backward on your skis, causing a loss of performance. Make up your own mind about this: In street shoes and no skis, flex your knees but not your ankles. You could fall backward; have something to hold onto. On skis and in stiffish boots you won’t tip backward when you flex your knees, but your weight will still go there and your calves will press against the backs of your ski boots. This will make you use your quads more to hold yourself up, taking some strength away from doing other things and tiring your legs sooner. The position will also lock your ankle joints somewhat so you can’t turn or tilt your feet as well to make the skis do the same. This movement will also take weight off the front of the skis (although sometimes desirable) and so they cannot engage the snow as well with their flared tips that would otherwise enhance the skis’ turning. But boots are made with different flexes, you say. Yes, because we don’t want the boot to allow us to collapse forward, either. The amount of resistance to this flexing that we want depends on the forces we produce. Beginning skiers ski at slower speeds, developing less forces on their boots, so can use a softer-flexing boot, whereas advanced skiers who may ski faster or on steeper slopes would likely want a stiffer boot in those cases but not perhaps so stiff if skiing in moguls. Thus all these classes of skiers can stay balanced even though in boots with different stiffnesses. And because there are different ways to ski, some advanced skiers may still want a boot that does not flex at all. The good news is that you can adjust the stiffness of boots in part by how you buckle them (tighter buckling equals stiffer boots), and some boots have mechanical ways to adjust stiffness. One year I bought a pair of boots with a stiffness feature that could be easily adjusted on the hill, allowing me to experiment with this concept and reach my conclusion just outlined.
A good boot fit, it is said, is one that gives the
foot a hug but does not cause tightness or pressure spots. A racer might want a
bear hug; a beginner might opt for a boot that is not uncomfortable. (Note the
phrase is not "comfortable" but "not uncomfortable". Performance must count even
more than comfort.) In the old days we used laces to cinch the boots tightly on
our feet; now we use various kinds of buckles. Better boots have screw
adjustments that allow the buckle itself to be made longer or shorter to provide
a greater range of adjustment. Many boots now have "power straps" at the boot
tops which cinch down with velcro so that the shin of the leg is close against
the tongue of the boot. Front entry boots are mainly a thing of the past,
'though some are still around; most models of these were not designed for
performance. Downhill or alpine ski boots have rigid soles and stiff side support at the ankles. They are not designed for walking, but for skiing. (Some do have adjusting levers at the rear to switch the boot flex from a walking to a skiing mode.) Another style of boot is the Nordic or cross-country ski boot, including Telemark boots. These are designed for walking, with a sole that bends but still with stiff lateral support so they may help in gripping the snow with the skis' edges. Ski technique that is used with these two classes of boots differs, and so does the skiing result. Here we consider only downhill or alpine boots. Telemark skiing On your first ski trips you may want to rent boots as you try out the sport. If so, rent them at the ski area even if it costs more; that way if your selection does not work out, you can exchange them without ruining your day or your lesson. If you have a private instructor, he or she can go with you to the rental shop. Go early in the day, or the evening before your ski day, so there will be a greater selection and you can try the sizes above and below the one that might fit you. Walk in them in the shop for twenty minutes to see if they still feel right. If there is pain, start over with another pair. A good rental shop will be able to suggest a model for your foot shape and skill level. But beware, for often they are not sensitive to the importance of providing a boot that you can flex forward. You should insist on this feature. If you have your boots overnight, keep them in a warm place. Boots otherwise will stiffen and be difficult to impossible to put on. Too, the liners of the boots do with use conform more closely to your feet; rental boots will have conformed to someone else's feet and will conform to yours sooner if warm. Once you have decided skiing is to be a sport for you, your fist purchase should be boots. At the start you do not need a high-performance boot for you will not yet be developing the forces that can pressure such boots to bend adequately. A softer flex is desirable at first. Having your own boots will avoid the hassles of testing a pair in the rental shops and you will have a pair that "knows" your foot shape. Even so, if you have not skied in them for awhile, before skiing--say the evening before--you should put them on in a warm place to give them a chance to reconform to your foot, for the liner will sag into a new shape with time. Also see the page "Bend Your Knees While You Ski" to learn why boots matter. Copied below is information from our page "Gender and Skiing", which relates closely to boot selection and adjustment: Women have calf muscles that are longer than men's. The calf muscle usual for women tends to be long and extend down the back of the leg, even into the top of a standard ski boot. The male calf muscle, however, is bunched up more in the upper half of the lower leg like a chicken's drumstick, and ends above the top of the standard ski boot. Now, boots for women are being made taking this difference into account. They no longer need to be told they have "fat" legs or suffer calf-muscle cramps. Women's hips are wider than men's. Without getting into the biological necessity for this, how does this relate to skiing? Well, the leg thigh bones (femurs) are set farther apart on women than for men, yet when women's thighs drop down toward the knees, the thighs angle inward (called a Q angle) and in many cases cause the knees to be close. Then below the knees, the lower legs may be vertical or tilted slightly outward, giving a so-called "knock-kneed" stance. There is much variation in individuals in their leg configurations. Men on the other hand, are more likely to be more straight-legged or even have the knees a bit apart in a "bow-legged" stance. Now, to understand the importance of this anatomical factor, we need to remember that in modern skiing the turn is initiated from a position standing on the uphill edge of the skis and then tipping the ankles with the body above following so the whole mass moves across the skis toward the new turn, usually from the uphill side of the skis to the downhill side. The knock-kneed person would naturally develop more angle on the uphill ski edges at the ends of turns and therefore must move farther across the skis to effect this tipping. This move is a hard one to do, yet is the heart of modern skiing. Knocked knees make the move harder still. The bow-legged person would have the opposite problem, not being able to get needed edge at the ends of turns but being able to initiate a new turn more easily. So this factor has a down side for both genders, at least for those affected. A trained instructor's eye can give you an initial idea if you have an issue with your leg angles, or use this "quick-and-dirty" method: Standing in your ski boots on a smooth and level spot, align the center of your boot toe against an outside corner, such as a square post's edge, filing cabinet edge, or doorway. You can even use a ski pole positioned vertically for the upright line you need. Then, bending both ankles, let the knees press forward and see where the one above the centered boot toe comes to the straight edge. If the center of the knee comes to the edge, you're probably O.K., but if the knee's center is far off to either side, consider an alignment check. Then repeat the test with the other leg, for most of us are not perfectly symmetrical. If you are off-center and suspect it may affect your skiing, place footbeds made for your feet inside your ski boots and see a boot alignment specialist. BINDINGS & RISERS Alpine ski bindings are designed to release boots before stresses build to the point where injury is likely. They do not always succeed, of course, and so skiing remains an activity that must be done with acceptance of risk. Bindings are set by certified ski shop technicians according to industry standards that relate to individual skier's age, height, weight, and skill level. Skiers can waive the settings recommended, and some do who find the risk of injury from a fall greater than the risk from a binding not releasing. Such skiers are in the advanced and expert categories and may be racers and skiers of steep slopes and/or deep powder. Risers are now often added to ski bindings between the bindings and the skis. These raise the boot and increase the leverage that can be applied to the skis when edging. Maintenance of bindings include keeping them free from dirt which could create increased friction in the working parts so they do not release properly. Periodic inspections are also recommended by most binding manufacturers; take them to a certified ski shop for a checkup. The release point of bindings is set using a DIN chart. Here is a definition of DIN from an entry in Yahoo:
For chart of settings for release bindings: exits POLES Ski poles have a long shaft with a grip handle on the top, straps for your wrists (usually), and a small circular ring (basket) at the pointed end. Poles are not necessary in skiing, but they sure do help. Skiers use them for pushing while walking or stopping slow slides while stepping around. While skiing, they are used as a sort of metronome timing device that helps create turns of proper shapes. Poles also give tactile reinforcement to our perceptions of the steepness of a slope when we touch them. And they give us a feel for the snow texture so that we can set up our moves the best way. They are like antennas, and so we get used to their heft and their swing as well as their length, and so it is best to use the same set of poles consistently. Still, there are poles that adjust in length, and some prefer these. A pole that flexes some will help avoid any jarring with a slight misplacement of a pole in skiing. And a thin pole is useful in deeper powder conditions so that it does not drag in the snow so much while partly submerged. A lighter pole helps keep the swinging force near the hand and allows for more accurate pole plants. Pole straps should be used, allowing the poles to be swung forward from the wrist while making a plant. (An older style handle that was easier to put on and off, however, caused a tilt of the body to both properly plant the pole and hold the grip; these should be avoided.) For a general guide to proper length, turn a pole upside down and grip the pole under its basket. As a "rule of thumb" your forearm should be level with the floor. Ski with this length at first, but then try a little longer and a little shorter. Tweak pole length for personal preference, including the type of snow and skiing normally done, or have poles for each. Longer poles are better for walking, skiing powder. Shorter ones are better for skiing bumps .
See also Pole Usage. HELMETS Here is what the Professional Ski Instructors of America had to say about helmets as of December 8, 2008: "Helmets -- protective head
gear -- brain buckets -- are worn by rock climbers, ice climbers, mountain
bikers, road cyclists, kayakers, skydivers, paragliders, in-line skaters,
motocross enthusiasts and motorcylists, auto racers, equestrians, hockey
players, construction and utility workers, skiers and snowboarders; by
professionals and amateurs, kids and adults, men and women. Wearing protective
headgear is a matter of choice. Also see sections on Exercises for Developing Skiing Skills Children and Skiing and Slope Safety in this website, plus LidsOnKids at http://www.lidsonkids.org/home.asp: exits, CLOTHING, ETC. Goggles and dark glasses: Lighting conditions change during winter days.
Bright sun glints off snow surfaces--even more when snow is freshly fallen. But
that condition can be very different on overcast or stormy times, and changes
back and
Clothes, gaiters, socks, smoothness in boots. Layers of clothing. ALTERNATE SNOW SLIDING TOOLS snowblades or figgels, monoski, , telemark, snowboard, split snowboard, skwal, ski bikes, cross-country, etc. e-mail Bill Jones  "SKIING
IS A SLIDING SPORT"--a skiing web manual: Skiing
Web Manual Contents Why Read This Skiing Web Manual
That First Skiing Lesson
A Little Skiing History
Motion in Skiing
Conventional Skiing Wisdoms
Skier Excuses
Fear in Skiing
Conditioning for Skiing
Equipment and Technique
SKIING EQUIPMENT
How Skis
Work How
to Develop Balance on Skis
A Skiing Turn
Simplified
The Final Skiing Skill: pressure management
Tactics for Terrains and Snow Textures and Racing Skiing Tips and
Tales--a potpourri
Exercises for Developing Skiing Skills
Children
and Skiing
Age and Skiing
Gender and Skiing Culture
& Skiing Skiing Ethics
and Slope Survival Slope Safety
Skiing Environment
Glossary Videos and Apps Acknowledgements
SkiMyBest Website Contents "SKIING
IS A SLIDING SPORT"--a skiing web manual: Skiing
Web Manual Contents Why Read This Skiing Web Manual
That First Skiing Lesson
A Little Skiing History
Motion in Skiing
Conventional Skiing Wisdoms
Skier Excuses
Fear in Skiing
Conditioning for Skiing
Equipment and Technique
SKIING EQUIPMENT
How Skis
Work How
to Develop Balance on Skis
A Skiing Turn
Simplified
The Final Skiing Skill: pressure management
Tactics for Terrains and Snow Textures and Racing Skiing Tips and
Tales--a potpourri
Exercises for Developing Skiing Skills
Children
and Skiing
Age and Skiing
Gender and Skiing Culture
& Skiing Skiing Ethics
and Slope Survival Slope Safety
Skiing Environment
Glossary Videos and Apps Acknowledgements
SkiMyBest Website Contents This "Skiing Web Manual...Skiing Equipment" page last modified April 11, 2024 . Did you come here from a link on another website? For latest version of this page, copy to your browser: http://www.SkiMyBest.com/skiequip.htm. Copyright © 2013, 2014, 2015, 2016, 2017, 2018, 2019, 2020, 2021, 2022. William R Jones. |
|

 the
delight these new ski-tools can give. Shaped skis come in differing degrees. The
more extreme are called "spoons", looking like that, or "clown feet", for the
same reason. Most shaped skis ski powder adequately, but perhaps no better than
or even not as well as some conventional skis. There are also fat skis now,
which are wide throughout their length. Designed for flotation in soft snow
because of their greater surface area, they perform fabulously in powder. Even
skiers with little prior success in powder often enjoy their first runs on these
new skis. Also read the article below about camber and rocker.
the
delight these new ski-tools can give. Shaped skis come in differing degrees. The
more extreme are called "spoons", looking like that, or "clown feet", for the
same reason. Most shaped skis ski powder adequately, but perhaps no better than
or even not as well as some conventional skis. There are also fat skis now,
which are wide throughout their length. Designed for flotation in soft snow
because of their greater surface area, they perform fabulously in powder. Even
skiers with little prior success in powder often enjoy their first runs on these
new skis. Also read the article below about camber and rocker.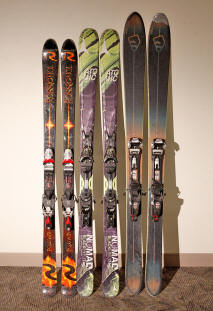 years skis were made with "camber", in which the underfoot part of the
ski arched upward when the ski was placed on its base. Different degrees of
camber were available and tended to spread a skier's weight along the length of
the ski. Thus a heavier or more aggressive skier would opt for more camber or
stiffer camber. Rocker is reverse camber; in other words, the skis arch upward
at tip when weighted in the middle. This provides a ski that will climb upwards
better out of deep powder and the design was first used for this purpose with
excellent effect. Next, experimentation began with having rocker in only parts
of the ski length--in the tip or tail areas or both, with the central part of
the ski still having camber. The effect of this is to give a ski that can be
swiveled more easily because it's edges are less likely to catch on the snow.
Yet with the underfoot area still having camber, it can still engage the snow
there when the ski is tipped and arched. When that underfoot area is weighted
more by the skier or the forces of a turn, and the ski is tipped, the camber of
the underfoot area reverses and lines up with the rockered areas! Actually we
can get much the same effect of rocker in making swivel turns by "de-tuning"
(filing the edges so they are rounded) the tips and tails of skis so the edges
do not catch, while having the edges in the underfoot area tuned at a high edge
bevel. There was also an early ski made by Head, the Deep Powder, that was so
limber that its soft camber would reverse in soft snow. The inset picture of a
skier with older gear includes a rockered ski from perhaps circa 1960s. Are
there any really new ideas? Here is more on rocker,
from a letter written to a fellow skier, in early 2012:
years skis were made with "camber", in which the underfoot part of the
ski arched upward when the ski was placed on its base. Different degrees of
camber were available and tended to spread a skier's weight along the length of
the ski. Thus a heavier or more aggressive skier would opt for more camber or
stiffer camber. Rocker is reverse camber; in other words, the skis arch upward
at tip when weighted in the middle. This provides a ski that will climb upwards
better out of deep powder and the design was first used for this purpose with
excellent effect. Next, experimentation began with having rocker in only parts
of the ski length--in the tip or tail areas or both, with the central part of
the ski still having camber. The effect of this is to give a ski that can be
swiveled more easily because it's edges are less likely to catch on the snow.
Yet with the underfoot area still having camber, it can still engage the snow
there when the ski is tipped and arched. When that underfoot area is weighted
more by the skier or the forces of a turn, and the ski is tipped, the camber of
the underfoot area reverses and lines up with the rockered areas! Actually we
can get much the same effect of rocker in making swivel turns by "de-tuning"
(filing the edges so they are rounded) the tips and tails of skis so the edges
do not catch, while having the edges in the underfoot area tuned at a high edge
bevel. There was also an early ski made by Head, the Deep Powder, that was so
limber that its soft camber would reverse in soft snow. The inset picture of a
skier with older gear includes a rockered ski from perhaps circa 1960s. Are
there any really new ideas? Here is more on rocker,
from a letter written to a fellow skier, in early 2012: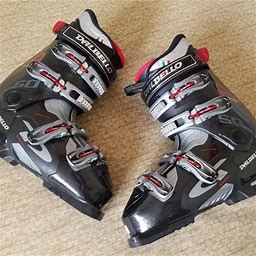

 forth from too bright to too dim can happen quickly. Thus you should have dark
glasses with you, and at times ones with eye protection at their sides, too. And
you should also have goggles handy; they can be perched on your helmet if not
needed. That way should the weather be snowy you can keep the snow from
peppering at your eyes while you ski. During cold times even when sunny, goggles
will also keep your eyes and face warmer. As with dark glasses, goggles come in
many shades for differing light conditions. Some goggles are shaped to be worn
over eyeglasses and some come with battery-operated fans to reduce fogging.
(Another way to help reduce fogging is to keep the face a little cool, even with
some forehead exposed; this will limit prespiration on the face, source of
the moisture that fogs the goggles. Avoid breathing into the goggles, too, or
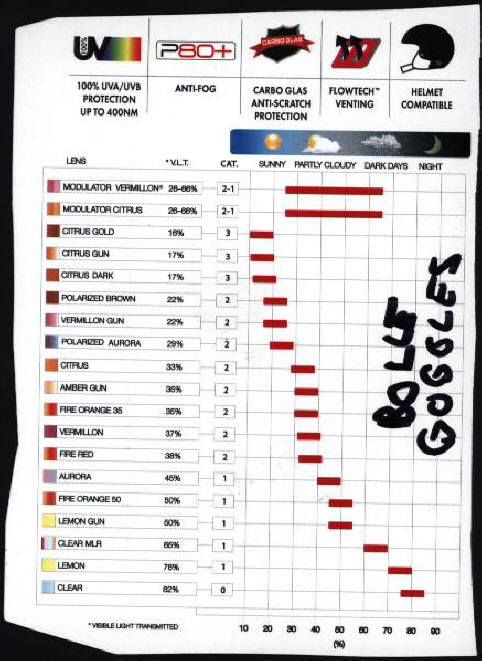
getting them wet.) Here is a table from Bolle describing their extensive line of
various goggle types. Note especially the types that are designed for a range of
condtions.
forth from too bright to too dim can happen quickly. Thus you should have dark
glasses with you, and at times ones with eye protection at their sides, too. And
you should also have goggles handy; they can be perched on your helmet if not
needed. That way should the weather be snowy you can keep the snow from
peppering at your eyes while you ski. During cold times even when sunny, goggles
will also keep your eyes and face warmer. As with dark glasses, goggles come in
many shades for differing light conditions. Some goggles are shaped to be worn
over eyeglasses and some come with battery-operated fans to reduce fogging.
(Another way to help reduce fogging is to keep the face a little cool, even with
some forehead exposed; this will limit prespiration on the face, source of
the moisture that fogs the goggles. Avoid breathing into the goggles, too, or
getting them wet.) Here is a table from Bolle describing their extensive line of
various goggle types. Note especially the types that are designed for a range of
condtions.